Before we get into the best order to apply your makeup, it’s important to work your way through your skin care routine. You don’t need to spend a ton of time on your skin care routine, but there are a few simple steps you should take to ensure your skin is ready for makeup. Below, three skin care steps to take before makeup.
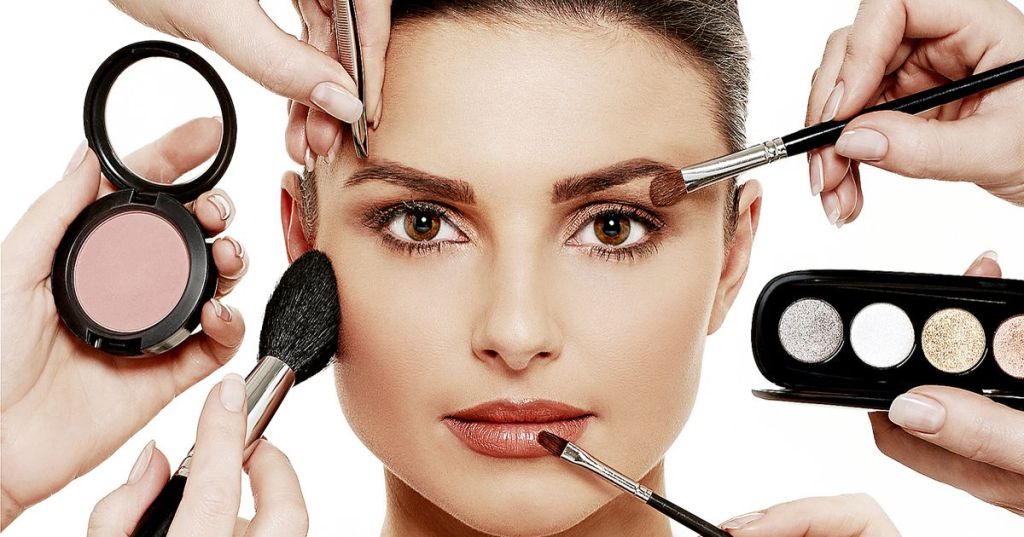
In terms of makeup, acing your face should be your first order of business before you move on to your lip makeup and eye makeup. But things can get complicated. Do you really need a primer? Does concealer come before or after foundation? We’re here to take guesswork out of the equation with our step-by-step guide to applying face makeup from start to finish.
STEP 1: PRIMER
Using a primer is one of the best things you can do when it comes to applying makeup. Primer, like the L’Oréal Paris Infallible Pro Glow Lock Makeup Primer or L’Oréal Paris Infallible Pro Matte Lock Makeup Primer, can help to give you an even canvas to work on, as it can help smooth lines. Primer can also help your makeup wear more evenly throughout the day. Choose a primer with a glowing finish if you have dry skin or a primer with a matte finish if you have oily skin. Regardless of which primer you pick, apply it all over your face or to targeted areas, depending on your skin’s specific concerns.
STEP 2: COLOR CORRECT
Have dark circles under eyes or redness you want to hide? Now’s the time to use a color correcting concealer, like one of the L’Oréal Paris True Match™ Color Correcting Crayons, to cover these up. Peach, bisque, or orange can disguise dark circles, green can neutralize the look of redness, purple can hide discoloration, and yellow can mask discoloration. Simply blend a small amount of color-correcting concealer onto targeted areas using your finger.
STEP 3: CONCEALER
Once you’re done color correcting, finish the cover up process by applying a flesh-toned concealer, like L’Oréal Paris True Match™ Super-Blendable Multi-Use Concealer (which comes in 14 true-to-you shades to match every skin tone and undertone), on top. Use the included applicator to blend and buff the concealer into your skin.
STEP 4: FOUNDATION
Your face wouldn’t be complete without a little foundation! There are so many different kinds of foundation out there, so choose one that suits your needs. For example, if you have oily skin, you may want to consider using a matte (a.k.a. non-shiny) finish foundation, like the L’Oréal Paris Infallible Pro-Matte Foundation. On the other hand, if you have dry skin, a radiant finish foundation, like the L’Oréal Paris Infallible Pro-Glow Foundation, might be a better option for you. Whichever foundation you choose, one of the best ways to apply it is with a makeup blender, like the L’Oréal Paris Infallible Blend Artist Foundation Blender.
Done with your face? Now, it’s time to move on to applying eye makeup. Get your eyebrow pencil, eye shadow, eyeliner, and mascara ready because it’s time to get started on your eye makeup!
STEP 1: EYEBROWS
Nowadays, it’s all about eyebrows—and the bigger, the better. Start by shaping and filling in your eyebrows with the L’Oréal Paris Brow Stylist Shape & Fill Mechanical Pencil to help create a well-defined arch. Not only will this look gorgeous, but it can act as a guide when it comes time to apply your eye shadow.
We’ve found that it’s easiest to apply eyeliner before mascara but after eye shadow. Reach for a waterproof eyeliner pencil, like the L’Oréal Paris Infallible Pro-Last Waterproof Pencil Eyeliner. You can even use this eyeliner in your waterline (this technique is called “tightlining”) for added definition.
You’re almost at the end! After you’re done with your face and eyes, it’s time to show your lips some love by following this step-by-step makeup routine.
STEP 1: LIP LINER
Before you apply lipstick, you should consider lining your lips—this can help prevent color from bleeding out or feathering. Choose a lip liner that’s the same shade as your lipstick and outline the natural line of your lips to help make your pout look fuller. You can also color in your lips with liner before applying the lipstick to help create a smooth base. Try the L’Oréal Paris Colour Riche Lip Liner or L’Oréal Paris Colour Riche Matte Lip Liner.
Congratulations! You’ve officially finished all of the steps in your makeup routine. Now, help set your look by spritzing on a setting spray, like the L’Oréal Paris Infallible Pro-Spray & Makeup Extender Setting Spray. To use, shake well and hold the bottle 8-10 inches away from your face. Close your eyes and spray it four to six times in an X and T motion. And there you have it!
HOW TO REMOVE YOUR MAKEUP AT THE END OF THE DAY
Don’t hop into bed without taking your makeup off first. Sleeping in your makeup can lead to clogged pores—and clogged pores can lead to breakouts. Make things easy on yourself by keeping a bottle of micellar water on hand. Micellar water is a no-rinse cleansing option that helps remove dirt, oil, and makeup from the surface of your skin without harsh tugging. All you have to do is pour some of the L’Oréal Paris Micellar Cleansing Water Complete Cleanser Waterproof – All Skin Types onto a cotton pad, wipe the pad across your face, eyes, and lips, and you’re done with makeup removal.
Make sure hair is dry Curling wet hair can cause breakage and burning, so start with dry hair. Heat a curling iron with a short, spring-loaded clamp. A larger iron (such as one with a three-quarter-inch barrel) is the most versatile, allowing you to create everything from loose waves to tighter curls.
Comb and detangle hair Run a comb through your hair, removing any knots and tangles. You’ll have an easier time with the curling iron if your hair is tangle-free.
Take a section of hair and spritz with protectant spray Use your fingers to separate a small section of hair from the rest. It should be almost as wide as the barrel of your curling iron. Holding the section of hair near the ends with one hand, smooth it with the other, combing it again if you like. Then spritz it with a heat-protectant spray to prevent damage and help set the curl.
Tip: If your hair is coarse or particularly porous, set the curling iron to high, which will help set the curl. For finer hair, a lower temperature will work.
Wrap your hair in the iron Still holding the section of hair, grasp the handle of the curling iron in the other hand. Open the barrel, insert the section of hair, then close the barrel around the hair several inches above your hand. Slide the iron down the section of hair until it’s almost at the ends, then release the hair from your hand. Twirl the iron under, so that you’re wrapping the section of hair around the barrel several times, steadying and guiding the iron at the tip (make sure that it’s heat-proof first) with your other hand. How many times you wrap the hair around the barrel will depend on its length. As you roll the curling iron up, keep it more or less horizontal. When the iron is as high as you want the curl to go, stop rolling and release the clamp slightly. Count to five, then angle the iron so that the tip is pointing up and the handle is angling down, and release the curl entirely by reducing all pressure on the clamp while bringing the iron down and away from the hair.
Continue to wrap and release sections of hair Work through the rest of your hair, repeating Steps 3 and 4 with each section.
Lightly comb hair When finished, lightly comb through the curls and shape them with your fingers to arrange them just the way you want them.
The Ziploc method is my preferred method. It takes less time, and the ice cream usually ends up having a better texture. However, you’ll need rock salt – an ingredient which is not a common household item, yet not hard to find in your local supermarket.
Ingredients 1. Milk – 1 cup or 240 mL – I used Rice Milk; just make sure that if your milk is sweetened, you use less sugar 2. Sugar – 2 tbsp or 30mL – use less if you are using a sweetened milk substitute 3. Vanilla – 1/2 tsp or 2mL 4. Ice – 2 cups or 475 mL 5. Rock Salt – 1/4 cup or 60 mL – this ingredient can also be referred to as ice cream salt 6. A 1-Qt (.94 L) Ziploc bag 7. A 1-Gal (3.78 L) Ziploc bag
Step 1 Pour milk, sugar, and vanilla into quart-sized (.94 L) Ziploc bag; shake.
Step 2 Pour ice and rock salt in gallon-sized (3.78 L) Ziploc back; shake.
Step 3 Put small Ziploc into larger Ziploc. Slosh the bag back and fourth across your countertop until the ice cream becomes nice and thick.
Step 4 This is Ziploc ice cream; grab a spoon and just eat it right out of the bag! ;]
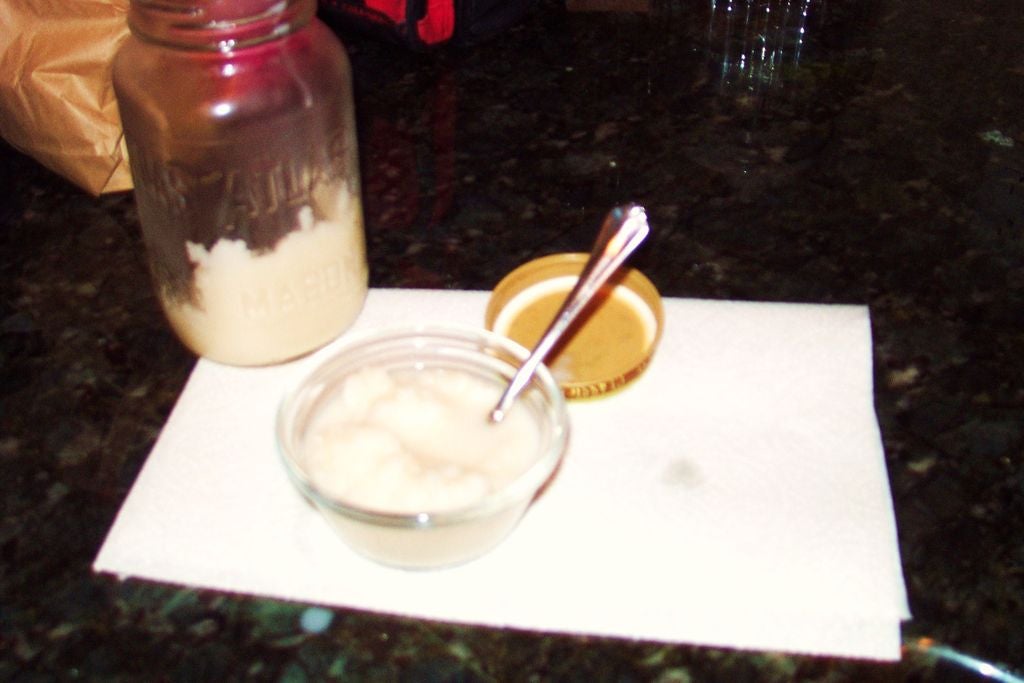
Step 2: The Jar Method
The jar method does take longer than the Ziploc method, but you have less chances of a mess, and you don’t need rock salt.
Ingredients: 1. Milk – 1 cup or 240mL – I used Rice Milk; just make sure that if your milk is sweetened, you use less sugar 2. Sugar – 2 tbsp or 30mL – use less if you are using a sweetened milk substitute 3. Vanilla – 1/2 tsp or 2mL 4. Jar 5. Freezer
Step 1 Measure out and pour all ingredients into jar; shake.
Step 2 Place your jar in the freezer. Placing it in between other items will help speed up the process. You’ll need to keep it in the freezer at least 3 1/2 hours, taking it out and shaking it at 30-minute intervals.
Step 3 When you take out your ice cream to shake and hear little or no “sloshing”, it is ready. Run it under some cool water to loosen up the top.
Step 4 Pour, serve, and consume. =D
Step 3: Notes
A few notes on this Instructable…
On rock salt… Rock salt varies by brand. At school we used 1/4 cup of rock salt for every 2 cups of ice. However, at home I used a different brand of rock salt and discovered that I needed a lot more – a whole cup of the stuff!
Also – the ice cream mixture is not necessarily directly proportional to the rock salt mixture; that is, if you were to halve the ingredients in the ice cream mixture, you could still use the same amount of rock salt and ice.
Additional notes may be added at later times, so keep checking back!
Good luck, and have fun! ~Labot2001
Oh! And I’d like to give a round of applause to Eric and everyone at Instructables HQ who helped design the new Editor! I absolutely LOVVEEE it! ;]
Before baking you’re cookies you must preheat the oven to 350 degrees Fahrenheit. The in one bowl mix you’re flower, baking soda, and salt.
Step 3: Mixing and Stirring
In a large bowl, beat the butter, then add the brown sugar and white sugar mix. Then add the vanilla and milk. When those are mixed together completely, add the eggs and mix again.
Step 4:
Then add the flower mix, and mix all the dry ingredients together in one huge bowl.
Step 5: Cookie Sheet
Take out a cookie sheet, take a spoon and scoop up ball sized pieces of dough, and carefully put them on the cookie sheet.
Step 6: Oven
Put the cookie sheet into the oven for 10-15 minutes. Let them rest on the cookie sheet for 3-4 minutes. Then using a spatula take the cookies off the cookie sheet and there ya go you’ve made yourself a batch of chocolate chip cookies.
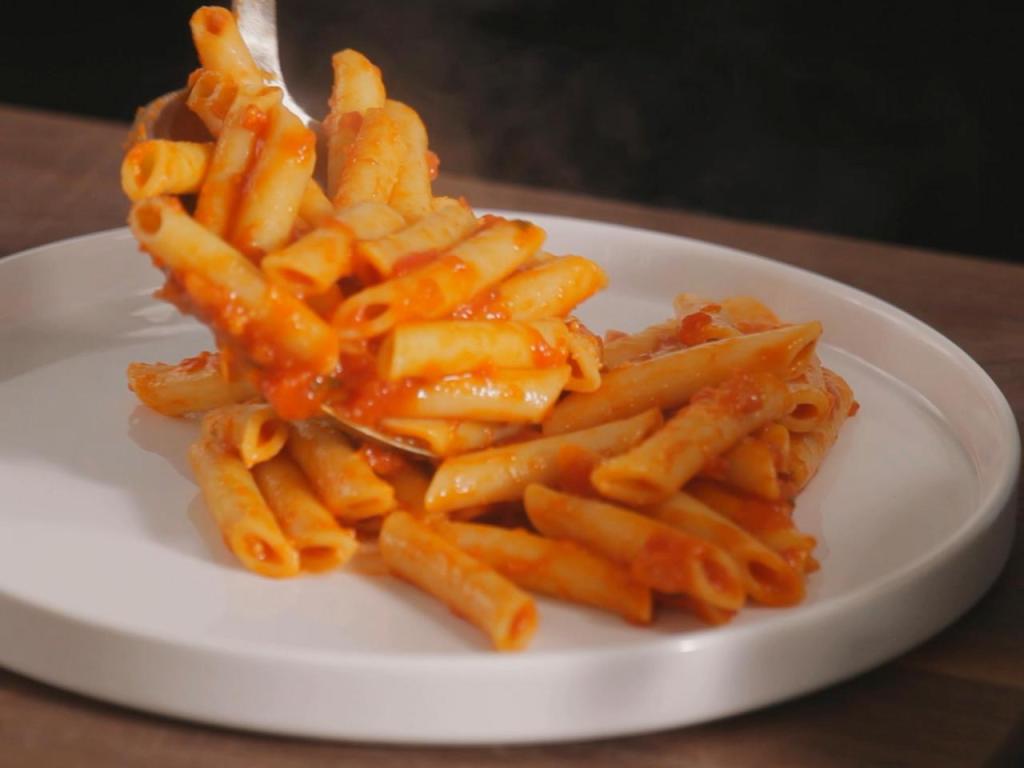
Step 1: Boil Water Start with a very large pot of water, about 6 quarts per pound of pasta. Bring it to a rapid boil. Tip: A pound of pasta feeds about 5 to 6 people.
Step 2: Add Salt Put in a lot of salt, about 3 tablespoons. If you taste the water, it should taste like the sea.
Step 3: Add the Pasta Drop in the pasta while the water is at a boil and give it a gentle stir.
Step 4: Stir Stir it occasionally while it cooks. Use the cooking time on the pasta package as a guide.
Step 5: Taste the Pasta But watch out — it’s hot! Sample the pasta at about 2 minutes shy of the indicated time. It should be al dente. You’ll finish cooking it in the sauce. Tip: “Al dente” means “to the tooth,” meaning the pasta should still have a little bite to it.
Step 6: Drain Drain the pasta. Just be sure to save about 1 cup of the pasta water. If you have a pot with a colander insert, use it to drain the pasta. If not, drain the pasta in a colander set in the sink.
Step 7: Removing Ravioli If you’re cooking ravioli, use a slotted skimmer and gently lift the ravioli a few at a time.
Step 8: Stir in the Sauce Add the pasta to your sauce and finish cooking it in the sauce. Give it a stir to coat.
Step 9: Add Pasta Water Ladle a few tablespoons of the pasta water at a time until you have the right consistency to your sauce. Remember, the pasta will absorb the liquid. Tip: Pasta water helps to thicken the sauce.
Step 10: Buon Appetito! Simmer over medium-low heat — it’ll help the pasta soak up the sauce. Follow your recipe’s instructions for finishing the dish. And that’s all there is to it. Perfecto! Watch our how-to video for more.
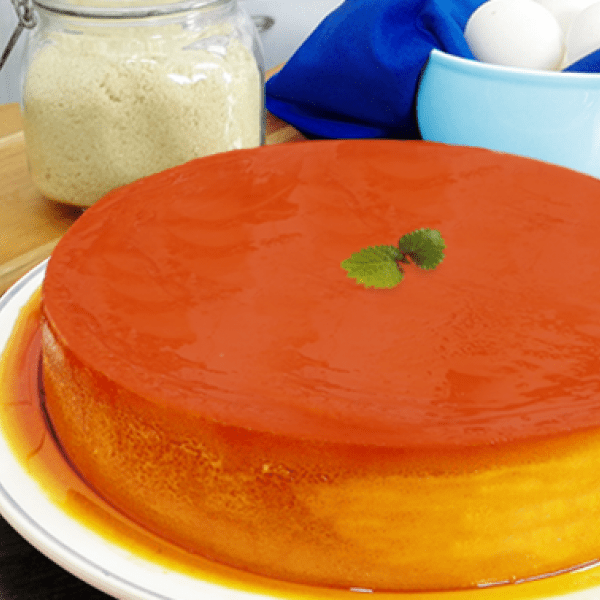
Prepare: 1.)Preheat oven to 180 deg Celsius. Have ready a 24 cm (8″) round stainless steel aluminum cake tin or 3 traditional oval llaneras. Put a kettle of water to boil.
*You also have the option to steam the leche flan over gently boiling water for about 50 minutes.
2.)Make Caramel: In a small, heavy bottomed saucepan, over medium-high heat, combine the granulated sugar and water. Stir frequently as the mixture heats to dissolve the sugar. Once mixture comes to a boil, do not stir again but only occasionally swirl the pan to distribute the heat. Keep it boiling until the edges start to caramelize and the syrup stops bubbling (around 8 minutes, depending on your pan). When it starts to color, frequently swirl the pan until the sugar is caramelized.
Use your sight and smell to gauge your caramel. It should be a rich amber color with a distinct caramel aroma. Before the syrup turns dark amber, pour it into your cake tin or llaneras. Swirl the tin so that the caramel coats the bottom. The caramel will continue to darken as it sets. Leave it to cool on your counter top.
3.)Make the custard:
In a large bowl, gently whisk the egg yolks to loosen them. Pour in NESTLÉ® All Purpose Cream and Milkmaid condensed milk. Continue mixing gently until combined. Try not to make the mixture bubble.
Pour the mixture through a very fine sieve into the caramel lined pan, trying to avoid forming bubbles.
Loosely cover the pan with aluminum foil.
4.)Bake the Flan (or steam it! See Procedure 1)
Place the pan into a large roasting pan or a larger cake tin and put this into the oven. Take your boiling water and pour it into the larger pan/cake tin, until water comes up about 1/3 to halfway up the sides of the smaller cake tin. This is called your Bain Marie or Bano Maria.
Bake in the preheated oven for about 50 minutes.
To test if the custard is done, lift up the foil and insert a thin knife into the center of the custard. If you can see the lines made by the knife, the custard is done. If the knife comes out with bits of custard sticking to it or if the point where it enters looks curdled, give it another 5-10 minutes and then check again.
When it’s done, take it out of the oven and out of the large, water-filled pan. Refrigerate at least 6 hours or overnight. The unmolded flan will keep in the fridge for up to a week.
5.)To serve: Run a thin-bladed knife around the edge of the of the cold flan (between the flan and the cake tin). Invert a serving dish over the cake tin. With 2 hands, hold the dish firmly against the tin then quickly flip both over. Carefully lift the pan off the dish. Use a spoon the scrape the syrup that’s stuck to the tin and pour it over the flan. Whack the hardened caramel on the tin with the back side of the spoon so that it breaks into shards. Scrape the shattered caramel onto the top of the flan for a decorative finish and added crunch.
Sturdy, single-wall aluminum pans, with or without nonstick coating, are great cake pans. Here are other points to keep in mind:
• Dark or Shiny? We prefer shiny pans for achieving a golden appearance. If you use a dark or dull-finish pan, reduce the oven temperature by 25°F and check doneness 3 to 5 minutes early to prevent overbrowning.
• Sizes and Shapes. Many recipes call for either 8×1½-inch or 9×1½-inch round pans. they are interchangeable, but cakes baked in 8-inch pans generally require 5 to 10 minutes longer in the oven. Square and round pans could also be used as long as they’re the size called for in the recipe.
Step 3: Allow Ingredients to Reach Room Temperature
Many recipes require some ingredients, such as eggs and butter, to stand at room temperature for a specified time. This is because room-temp butter blends more easily with other ingredients and room-temp eggs result in higher cake volume. (For food safety reasons, don’t leave the eggs at room temperature for more time than specified in the recipe.)
Tip: Never use melted butter when softened butter is called for. It will ruin the cake texture.
Step 4: Prep the Pans
Nobody wants their cake to stick to the pan, so it’s important to prep your pans before pouring in the batter. With the exception of angel food and chiffon cakes, most recipes call for greasing or lining the pan before baking. Depending on your recipe, here’s how to do it:
If your recipe calls for greasing and flouring the pan, use a paper towel or pastry brush to evenly spread shortening or butter on the bottom, corners, and 1 inch up the sides of the pan. (Or spray nonstick cooking spray.) Sprinkle a little flour into the pan; tap the pan so the flour covers all greased surfaces. Tap out any extra flour into the sink.
If a recipe calls for lining the pan with waxed or parchment paper, place the pan on the paper and trace around its base with a pencil. Cut just inside the traced line; line the bottom of a lightly greased pan with the paper, smoothing any wrinkles or bubbles. Unless otherwise specified, grease and flour the lined pan, too.
Tip: For chocolate cakes, use cocoa powder instead of flour to coat the pan. Cocoa powder prevents sticking and enhances the cake’s flavor, and traces of it won’t be obvious after the cake is turned out of the pan.
Step 5: Preheat the Oven
When a cake bakes too quickly it can develop tunnels and cracks, too slowly and it can be coarse. Let your oven preheat for at least 10 minutes, and use an oven thermometer to make sure it reaches the proper temperature. Remember, if you’re using dark cake pans, you’ll want to reduce the oven temperature called for in your recipe by 25°F.
Step 6: Stir Together Dry Ingredients
Dry ingredients usually include flour, baking powder and/or baking soda, and salt. Rather than adding each dry ingredient individually to the batter, mix them together in a bowl beforehand. That way you know that the ingredients are equally distributed throughout the batter.
Step 7: Combine the Butter and Sugar
Wondering how to make a cake with light, tender texture? A crucial step is to make sure the butter (or shortening, if specified in the recipe) and the sugar are perfectly combined. Here’s how:
Using an electric mixer on medium to high speed, beat the butter for 30 seconds. Generally, a stand mixer requires a medium speed for this step and a hand mixer requires a higher speed.
Add the sugar in small amounts, about ¼ cup at a time, beating on medium. Scrape the sides of the bowl as needed. Adding the sugar little by little incorporates more air into the mixture.
Beat the mixture on medium speed until it is combined and has a light, fluffy texture. (This will probably take 3 to 5 minutes. Don’tcheat on your timing.) Scrape the bowl occasionally while beating. Tiny bubbles will be created as the butter and sugar are combined, which will give your cake that dreamy, light, fluffy texture.
Step 8: Add Eggs One at a Time
Break one egg into a custard cup. (This way if you get shell fragments, you can easily fish them out of the cup rather than try to get them out of the batter.) Add the egg to the butter-sugar mixture and beat well. Repeat with the remaining eggs.
Step 9: Alternate Adding Dry and Wet Ingredients
Alternate between adding some of the flour mixture and some of the milk (or other liquid specified in the recipe) to the butter-egg-sugar mixture, beating on low speed after each addition until combined. Begin and end with the flour mixture. (This is because when liquid is mixed into flour, gluten begins to form. Too much gluten makes for a tough cake, so be sure to start and finish with flour, and not overmix once you add liquid.)
Tip: Be careful not to overmix at this stage or else you might get elongated, irregular holes in the finished cake.
Step 10: Pour Batter Into Pans and Bake
Divide the batter evenly between the baking pans. Use an offset metal spatula to spread the batter in an even layer. Be sure to spread it to the pan edge. Bake your cake according to your recipe’s directions.
Step 11: Check Cake for Doneness
How do you avoid a dry cake? Avoid overbaking it. Start checking the cake for doneness after the recipe’s stated minimum baking time. For creamed cakes, insert a wooden toothpick near the center of the cake. If the pick comes out clean, the cake is done.
Step 12: Cool the Cake
Let the cakes cool in the pans for 10 minutes maximum. To remove from the pans, run a knife around the edges of the cake to loosen it from the sides. Place a wire rack over the top of the cake and flip the pan. Lift the pan off the cake, being careful not to tear the edges of the cake. If you used waxed or parchment paper, gently peel the paper off the cake.
Allow the cake to cool completely (about 1 hour). This is a key step to letting the cake firm up, making it less likely to break apart as you frost it. (And it keeps the frosting from melting as soon as you spread it!)
Step 13: Assemble the Cake
To avoid crumbs in your frosting, brush the cake layers with a pastry brush before assembling. Spread about ½ cup of frosting over the first layer, then carefully top with the next layer. Repeat until the cake is assembled.
Step 14: Add the First Coat of Frosting
Add a crumb coat by spreading a very thin layer of frosting over the sides and top of the cake. This initial coat doesn’t need to look perfect; it’s another way to keep the crumbs out of the frosting. Let the cake stand for 30 minutes so the frosting sets up.
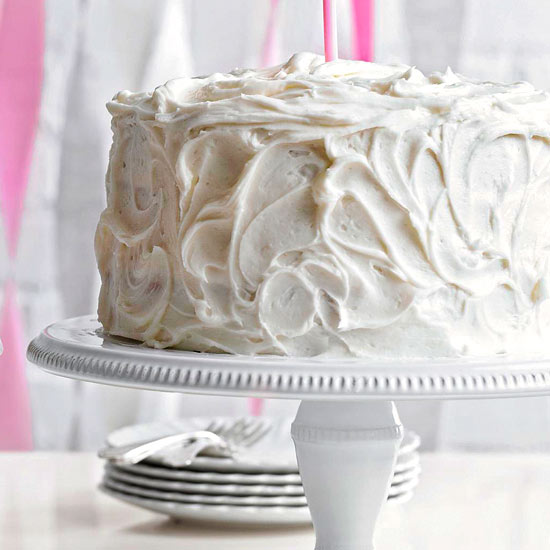
Step 15: Frost and Decorate
Using an offset spatula or table knife, generously spread the remaining frosting over the top and sides of the cake, swirling as you go. Once the cake is completely covered, go back and add more swirls as desired. Serve the cake within 2 hours or refrigerate to store.